Features

Living with hills — Part 2

by  post_author );
// If display name is not available then use nickname as display name
if ( empty( $display_name ) )
$display_name = get_the_author_meta( ‘nickname’, $post->post_author );
echo $display_name;
?>

More “Living with hills (and how you can learn to love them)“, part 2 of ?

I had a few questions after the first hills article and I thought answering them would be a good start for this follow on.

Question 1 Some riders seem to stand up when doing hills and some sit in the saddle. Why is that? When should one stand going up a hill? Is there an ideal way (i.e. intermittently sit/stand sit/stand) to shoot for? What are the advantages and disadvantages of standing to climb a hill?

You get the most power generation sitting down and keeping your cadence up (using clips and a good “circle” technique, see #2). However, when you stand up, you do get the added benefit of all your weight pushing down on the pedal — as long as you’re lifting your other leg and not pushing it up too!!

Personally, I haven’t found that standing really gets me going any faster, and takes just as much, if not more, energy and I get winded faster. Even so, standing can give your hamstrings a break. I had a friend who was a very good climber and he mimicked some tour-de-france rider who claimed that changing your hand positions from the drops to the hoods to the top of the handle bars gave you six positions for climbing (those three positions and sitting or standing). He further claimed that each position used slightly different muscles so that you could get some good benefits by switching between them on a climb. Though I was never quite convinced of the theory, he always beat me up the hills. On a long hard climb, I’ll stand about 25% of the way, just for the change. Also, have you ever heard of “the magic shift”? Shift up to a higher gear or two as you’re standing, and shift back to a lower gear as you’re sitting down.

Question 2 Some riders do not have clips, or those straps on their pedals. Does having the right clips help the climb by lifting with one leg while pushing with the other? If using the lifting leg is helpful, what is the best technique?
Pedals with toe clips

Pedals with Toe Clips

Yeah, clips (or cleated shoes and “clipless” pedals) help engage more of your leg muscles than your quads — which is what your mostly using if you have just a flat pedal and no clips. Pedaling in a circle is the most effective way to use all of your leg muscles. Practice in a training stand, on a stationary bike, or on a flat section of road. Unclip one leg and try to make a perfectly smooth circle with the other leg. Then switch feet. It’s harder than you think, but a little practice and you’ll be spinning up faster that you can say “Contador!” If you aren’t lifting the leg that’s not providing power, you’re using your other leg to lift it up and using power that would otherwise be delivered to the wheels. Another tip I’ve heard and used is to move your foot like you were scraping mud off the bottom of your shoe using the pedal.

“Clipless”* cycling shoes have a number of advantages over your sneakers. First, the soles are quite stiff and this allows the pressure on your feet to be distributed and not concentrated on the ball of your foot. Secondly, the direct connection between the shoe and the pedal lets you use that upstroke to contribute the power of your hamstrings to the move the cranks. A properly fit cycling shoe along with a proper spinning technique will let you ride farther with less foot fatigue.

Shoes with CleatsClipless Pedals
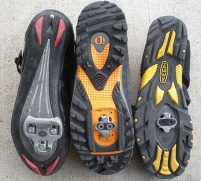
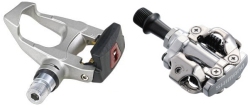
Cleats on shoes (left). Clipless Pedals (right).

This is also a good time to talk about cadence. Cadence is the number of revolutions per minute of the cranks (i.e., your feet). Racing cyclists generally have cadences of 80 to 110 RPM. Recreational riders are usually at 60-80 RPM. When you’re climbing a hill, your cadence will drop about 20 RPM and that’s normal. The advantages of keeping a higher cadence is that you are doing those circles using more muscles and that puts less stress on your knee joints. It’s just another factor you can experiment with to get a more comfortable and efficient ride.

*-clipless in the sense that the cage-style pedals that were the first attempt at providing lifting power were called “Clips”. Those were replace by “clipless” in which a cleat on the shoe is “clipped” into the pedal. The terms can be confusing because you “clip-in” with a “clipless” pedal.

Question 3 Should one ‘carb up’ prior to a climb or wait to get hungry?

Long climb coming up? Carb up about 10-20 minutes before you get to the hill. Otherwise, the sugars won’t be digested enough to help you. Shorter climbs? — not really going to help much as you’ll be over them before the sugar boost kicks in. Best to eat a good pre-ride meal with enough time to digest some of the food, since generally, the body will divert resources from digestion to support activity. That time will, of course, vary with individuals and some people may prefer to go out on an empty stomach. Whatever works for you. You can’t do long distances without fuel, however. Intense exercise requires 30-60g of carbohydrates per hour**– you can burn 6000 calories doing a century ride, so don’t neglect your need for calories when you’re out there riding. If you use gels, you’ll need to drink water with them or they’ll just sit there making you feel sluggish.

** – “Life cycle nutrition: an evidence-based approach.” S. Edelstein, J. Sharlin

Question 4 Any tips on clothing for climbing and descent?

Sounds like another article on “Why we wear spandex!” ;) Avoiding the deeper issue of spandex for now, for cycling in general, you want tight fitting clothing to be more aerodynamic and to avoid flapping. If your clothes are flapping, that means you’re catching the wind and that sucks energy from your forward motion, meaning you have to put in more effort to go the same distance as your body glove clad riding partner. You’ll want good clothing that wicks away moisture, too, but I’ll save that for the “Why spandex?” article.

As for what to wear when, well, that’s very unique to individuals, the time of year, and the current weather conditions. I guess I’m being asked about cold weather because in hot weather you just wear as little as you can possibly get away with and not end up in jail. In colder and wet weather, you’ll have to experiment with what works for you. A wise, experienced cyclist once taught me to “go out expecting to be cold for ten minutes or so”. With activity, you’ll warm up soon and if you overdress, the rest of your ride you’ll be uncomfortably hot.” See the Winter Cycling Tips article on this site for some good guidelines for clothing to use in varying conditions (with a good deal of thanks due to the crew at Freeze-Thaw Cycles in State College. Caution: Spandex ahead).

Winter Cycling Tips

Tips from our October 11, 2010 Meeting

Maneuvering Tips


Slow & Steady

When there’s even the chance of ice on the road, slow down. If you do encounter an ice patch, DON’T PANIC — keep your line, keep your hands off the brakes, and ride through it. If you try to turn or stop on an icy section of roadway, you’re most likely going to fall. Be especially careful at dusk and dawn when the road surfaces are just freezing or still frozen.

Generally, though, the SLOW DOWN tip is applicable to all bad weather conditions, just as it is in other vehicles.

Winter Conditions

In the area, even after a large snowstorm, roads are usually clear enough for riding within 1-3 days of a storm.

State College Borough, Ferguson Township, Penn State plow their bike lanes and paths after street snow removal is done. College Township plows some paths, but not all. Patton and Harris do not currently provide winter maintenance for their bike paths. (Bicyclists in those townships who’d like to see winter clearing are encouraged to attend a supervisor’s meeting and make a comment during the public comment portion!)

Update 2019: While we reported earlier that Harris and College Twps were clearing the South Atherton bikeway, in 2018-19, that isn’t being done. Use those paths in winter? Call the townships and let them know. Winter 2016: Harris Township is now clearing the S. Atherton Bikeway. Thanks to Centre Bike’s Jim Serene, Township Manager Amy Farkas and the Harris Twp Board of Supervisors for making this happen.

Clothing


Dry 50-60 Degree

  • Torso – Short sleeve jersey, arm warmers
  • Legs – Shorts with knee warmers, Knickers, Capris
  • Hands – Short finger gloves, light full-finger gloves
  • Feet – mid cuff socks, shoes
  • Head – headband for ears under helmet

Dry 30-49 Degree

  • Torso – Long sleeve jersey, long sleeve base layer, vest
  • Legs – Knickers/Capris with leg warmers, light/midweight tights
  • Hands – Full-finger gloves
  • Feet – Wool socks, shoes
  • Head – Helmet cover/liner or skull cap under helmet

Dry 10-29 Degree

  • Torso –Long sleeve jersey, long sleeve baselayer, wind breaking thermal jacket
  • Legs – Insulated tights over shorts or Capris, Wind pants over knickers & warmers
  • Hands – Cold weather full-finger gloves, Lobster gloves, handwarmers, glove liners
  • Feet – Thick wool socks, shoes, thermal shoe covers, or winter riding boots
  • Head – Balaclava under helmet, helmet cover

Dry 0 Degree

  • Torso –Long sleeve thermal jersey, long sleeve baselayer, insulated wind jacket
  • Legs – Insulated tights with baggy overlayer
  • Hands – Cold weather full-finger gloves, Lobster Gloves, Handwarmers, glove liners
  • Feet – Thick wool socks, shoes, thermal shoe covers, or winter riding boots
  • Head – Balaclava under helmet, eye protection

Rainy Conditions

Rain protection is either waterproof or water resistant. Waterproof means that seams will be sealed and breathability will diminish. Ventilation is important. Water resistant means that water could get through in a downpour, but a shower will be kept out. Water resistant is much more breathable and does not need added ventilation. Armpit ventilation is a nice extra to have if you are buying new rain gear (or any jacket for that matter).

Equipment


Tires

For snowy and icy conditions, reduce tire pressure for better traction. Try 40-50% of the rated pressure to start, but you’ll have to experiment based on your weight and the tire size. Too low a pressure and the tire will want to come off the rim. Mountain Bike or Cyclocross knobby tires are recommended for winter conditions (but under dry conditions, standard tires are fine, too). Studded tires are available, but the consensus was that studs are good where there are continual icy conditions, such as trail riding, but that they don’t work as well on wet or dry pavement. The attendees preferred regular tires to studded tires for mixed pavement/snow/ice riding.

Lights

In the winter, when daylight is at a premium and conditions can change quickly, don’t go out without them. Front and back. Minimally, use blinking lights that can be seen 500 ft in either direction. Better, are higher power headlamps because they not only allow you to be seen, but let you see road obstacles such as downed limbs, potholes, or piles of ice/snow. With the proliferation of smart phones and distracted drivers, we now suggest front and rear lights 24/7/365, especially with strobe/blinking modes. You need to get those drivers eyes looking up.

Helmet

Two words: Wear one! Always. This is under Equipment and not Clothing because we don’t feel a helmet is optional, especially in winter conditions. You buckle up each time you get into your car, right? Then put a helmet on each time you get on your bike. A fall in winter conditions is more likely than in other seasons and rather than being surrounded by two tons of steel and protected by a seat belt and air bags, your head is at risk for collisions with those two ton missiles and believe us, it’s more fragile than you like to think.

Derailleurs and chains

Keep your chain and derailleur pivot points clean and well-lubricated. This is especially important in Central PA where road salt is heavily used.

Brakes

A quick wipe of your rims and brake pads after a ride will keep accumulated grit from damaging wheel braking surfaces. Lube the brake pivot points as you do your derailleurs.

Something we forgot? Add a comment below and share your tips with us.

Living with hills (and how you can learn to love them)

Hills suck image

Hills suck!

by post_author );
// If display name is not available then use nickname as display name
if ( empty( $display_name ) )
$display_name = get_the_author_meta( ‘nickname’, $post->post_author );
echo $display_name;
?>

Part 1 of …

There’s an old adage in cycling: If your legs hurt, you’re in too high of a gear. If your lungs hurt, you’re in too low of a gear. If both your legs and your lungs hurt, you’re climbing a hill!

No ifs, no ands, no buts, hills suck. It doesn’t matter about your level of fitness, how long you’ve ridden, how fast you ride, hills will suck. Why? Because, the amount of energy it takes to get over a given hill at a given speed is a basically* a constant for your bike and your weight. If you and your road bike weigh 165 lbs together, you’ll need to generate about 160 watts to get over Pine Grove Mountain at 5 mph. Using a mountain bike? The extra weight and higher rolling resistance of a big tire won’t help you here and requires another 20 watts. Double your speed (a great feat, by the way) to 10 mph and you’ll get up there twice as fast, but you’ll need an extra 170 watts.

OK, so with the fact that hills suck agreed to, how can you go about learning to love, or maybe achieve a fondness for, or at least not loathe the hill that’s between you and your destination?

Well, the quickest way to reduce the amount of work you need to get up a particular hill at a particular speed is to reduce the amount of weight you have to carry up.

That reduction can be from your bike and it’s components. Have a kickstand, but you park at a bike rack every day? Lose it. Have three water bottles attached for your 20 minute commute? Lose 2 (Water weighs 8lbs/gallon).  Want to
invest in a lighter bike? Seriously consider it, or at least upgrading from steel to alloy wheels!
Losing 5 lbs from your bike from any of the methods described will save you 4 watts.

Or, the weight reduction can be from you. Lighten up 10 lbs? The amount of work you have to do to get up your nemesis hill is reduced by another 10 watts and now you’re down to 145 from 160.

There are a host of other things you can do, and some of the simplest involve routine
bike maintenance that you want to be doing anyway. Pump up those tires to the maximum
pressure listed on the sidewall. Doing so reduces your rolling resistance and is an immediate
and completely free improvement (and if you ride on pavement 95% of the time, consider smoother, higher pressure tires). Lube your chain regularly and get a tune-up if you’re having shifting issues.

One of the biggest mistakes riders make when tackling hills is to go full power at the start of the slope. That’s a great way to feel like you’re king of the hill, but more often than not, your energy will peter out before you’re even a 1/4 of the way up and everyone will be passing you and wishing you a nice day. Find a speed that’s comfortable for you on the hardest part of the hill and make that your target average speed. It doesn’t matter that it’s 3,4, or 8 mph, but it should be a speed that you can consistently maintain going up the hill. Then, rather than attacking the hill at the bottom, start at or just slightly above your target average speed. You’ll find that when the going gets tougher, you’ll still have some reserves left to power through the really tough spots.

Anticipating shifts can be a great help on hills, too. If you’re halfway up the hill before you downshift, even the best derailleurs can strain under a full-power shift. A mis-shift in the middle of a climb usually leads to a great loss of momentum — and it takes even more energy to get moving again. Get into a lower gear before you need to, and you’ll find that you can keep that precious momentum and use it to your advantage.

On the rollers you find on a lot of Central PA routes, don’t be tempted to pedal fast going down in hopes that you’ll get farther up the next hill. That works occasionally but only if the next hill is smaller than the one you’re going down. If that next hill is the same height or bigger, all you’ll accomplish is to waste energy that you’ll need later. Save that energy! Let gravity pull you down the hill and shift to a medium gear that will not strain your legs and keep you at your target average speed as you climb.

The best way to start liking those hills, though, is to train and increase your power-to-weight ratio. It hasn’t been that long since I thought a 5 mile ride was a tremendous effort. As I ride around the area, I am constantly speeding up little hills that I remember absolutely hating when I first started to become an avid rider. What’s the difference now? I’ve ridden on hills that are much higher than what are now to me little bumps in the road. I’ve increased the distances I can ride so it’s not as much of a stretch to do my daily commute.

How to start training? First off, don’t just ride. You will need to challenge yourself, increasing your distances and speeds. Don’t be scared off by that; you don’t really have to stress yourself out too much. I have found that a few miles a week increase in your longest ride will slowly but surely build up your stamina. If you add a secondary goal to increase your speed by .2 mile/hr at the same time you’re increasing your distances, you’ll also slowly but surely decrease the amount of time/mile — and eventually, you’ll find you can be doing 20 miles when you used to do five. Want to improve even more? Throw in a few intervals — 30 secs at your peak output (i.e., ride as fast as you can) followed by a 2 minute cool-down. Repeat 3-5 times on a ride.

How does that help you on hills? Any increase in your distance/speed ability will be quickly felt as you tackle those hills. If you really want to increase your hill climbing, then you need to tackle more and higher hills. For that, you are in luck! You live in Central Pennsylvania! Pick a hill and try to do it once a week. Time yourself and try to shave 10-20 seconds off of your time each week. That doesn’t sound like a lot, but it will add up.

Loving hills? Well, maybe that was a stretch, but if you face them rather than avoiding them using some of the tips presented here, the rewards to your overall fitness will be great. You’ll soon find yourself not even noticing smaller hills that you hate now. And you’ll get to see what’s over that mountain.

* — see the references below for a full explanation of the physics of riding and hill climbing.

References:

My favorite local hill climbing training routes:

To Where the Pavement Ends
http://www.mapmyride.com/us/state-college-pa/to-where-the-pavement-ends-route-306079

To Where the Pavement Ends (Extended)
http://www.mapmyride.com/us/state-college-pa/to-where-the-pavement-ends-extended-route-15566678

http://bikecalculator.com/wattsUS.html

http://www.cptips.com/energy.htm

http://www.blog.ultracycle.net/2010/05/cycling-power-calculations


PHP Code Snippets Powered By : XYZScripts.com